Monday 30 March 2009

Working on Threads of Destiny

I am proud to announce that I've become a part of the Threads of Destiny postproduction team as a 2D compositor. This independent movie from Sweden is currently one of the most anticipated Star Wars fanfilms in production.

I myself was a fan of this project since 2006, so having a chance to participate is like a dream come true for me. And it definitely is a great challenge and test of my VFX skill also. I'm sure I'll learn a lot.

The story:
"100 years after "Return of the Jedi" the Jedi order and the Republic are once again active. The planet Coreign produces a special ore that can power an entire city. But the Skenvi empire is interested in its potential for supreme spaceship armor." (From threadsofdestiny.net)


Star Wars: Threads of Destiny trailer.

Watch the trailers on the homepage, read the info there and stay tuned for more.

- Martin

Saturday 28 March 2009

Above the Clouds

I've been trying to create this effect for soo long. Finally, thanks to a wonderful tutorial by Markus Gustafsson I was able to polish my version of "above the clouds" logo. And I love it.


- Martin

Friday 27 March 2009

Thursday 26 March 2009

Action Shot

I created this shot as a test of my action VFX. Also, I tried to create a nice film-look for my PAL video. I used an artificial Depth of Field method, some dark vignette and greenish filter as well as a lower frame rate (24). Apart from the gun and blood effects, of course.


- Martin

Monday 23 March 2009

Adobe After Effects Tips #4

The Timeline Organisation

Extracts from the book Adobe After Effects 7 Studio Techniques This time some tips focusing on optimizing your timeline workflow.

- You can hide any column you want by clicking on the column's title (e.g. right-click on the Parent column) and choosing Hide this. You can also add any column you want by choosing Columns-> and the one you want.

- You can customize your Column layer's set by adding any column you like and then swtiching to another layer (F4 or little bracket icon on the Toggle Switches/ Modes icon on the bottom of the timeline).

- You can rename the layer by selecting it and pressing Enter.

- Even if you're working just by yourself, it's always good to have your timeline clean and organised. Besides naming your layers, you can easily give them different colors (I like having Video layers blue, Audio green, Adjustment white, Camera red and Light yellow - for example, you can choose any color you want). Just right-click on the little rectangular icon right next to the name of the Layer and pick the color you want.

- In case you're working on a project with some other people, you can leave a comment for them in every layer. Just add a Comment column and type what you need. In case you want to add a comment on a specific frame of the video, just find the frame, press *, double-click on the marker that appears and add a comment. You also have several other options, like naming the marker as a Chapter, adding URL etc. Thing is that these are suported only by formats like Quick Time or SWF.

- If you're done with working with a layer and you want to hide it in the timeline, you can switch the little Shy marker for it. It's the first one on the right - when the little guy peeking over the line is gone, the layer is set for shy. Then you just need to activate the Shy controller above it to hide all the layers set for shy. This way you hide them in your timeline, but not in your composition.

- To lock selected layers quickly, hit Ctrl+L. To unlock them, hit Ctrl+Shift+L.

- Page Up / Down moves you by one frame in the timeline. Shift+PG Up / Down skip 10 frames.

- Move through the layers by hiting Ctrl + Up / Down.

- If you want to trim your work area, just hit Composition -> Trim Comp to Work Area.

- Ctrl + D duplicated layers, Ctrl + Shift + D splits them.

- To set the start point of a layer, highlight it and hit [ (] for the end point).

- You can make a selected layer to fit the Comp size by right-clicking on it and selecting Transform -> Fit to Comp (Ctrl+Alt+F). You can also choose to fit its height or width.

- You can zoom in your timeline by holding down Alt + rolling your middle m

- Switch between Timeline and Composition window by hiting \ .

- If you want to replace a certain layer in the composition by another layer from your project window while keeping all the effects and keyframes inside the original layer, just highlight the layer you want to be replaced and hold down Alt while draging the new in the Timeline. Very useful things, much better than copying all the settings of the original layer.


- Martin

Saturday 21 March 2009

Adobe After Effects Tips #3

Examining the Footage

Extracts from the book Adobe After Effects 7 Studio Techniques by Mark Christiansen. This time some tips on how the real visual artist examine their footage. I know there's no one on this blog really reading it , but you know...no reason not to post it :-).

- Read and understand the Info panel. 2% of R, G and B instead of 0% means your black is not black (it often an effect caused by render, when colors loose a bit of quality), as well as while 100% white is OK, 300% white means someone's been messing with your intensity. Just roll over the footage with your mouse and read the color numbers - being precise means beeing good.

- In the Time Control window, right next to the RAM preview icon, there's a Loop controller. By clicking it you can choose whether you want to loop the preview, play it once, or play it in a ping-pong style (forward-backward-forward...). Note that good visual artists not only let their preview loop, studying the footage carefuly for several minutes, they also study it when playing backwards.

- Zoom your footage and examine the crucial spots in more detail.

- Don't be affraid to switch color channels (Show channel icon in your Composition window, right next to the resolution icon) and examine the footage one by one.

- Try to examine the footage with high black or white level. Just put some Adjustment Layer in, add Levels effect and observe everything under different levels.

- Be precise. One little error can spoil your whole render. Keep looking for mistakes you might not see, for they often cause the greatest problems.

I learned to love the Studio Techniques book. Even after finishing the first Chapter, it can't wait to continue learning.

- Martin

Thursday 19 March 2009

Adobe After Effects Tips #2

Projects, Compositions, Previews

Extracts from the book Adobe After Effects 7 Studio Techniques by Mark Christiansen.

- Great thing for compositing is to cooperate with Photoshop. You can then import your .psd project in the After Effects, choose import as a Composition option and you have all your layers, names etc. from PS in your AAE project.

- You can also create Photoshop file right in your current composition. Just hit Layer -> New -> Adobe Photshop File. PS automaticaly opens the file, allowing you to create whatever you want. Then when you save the file and hit Reloead Footage in your AAE project window (just highlight the newly created .psd file, right-click it and hit Reload Footage) it automaticaly finds the changes and you can continue working with in your AAE composition. Nice and easy.

- When choosing digital source media, people often consider .png to be more or less like .jpg - great compression for a cost of low quality. It's not really true - supporting 8-16 Bit Depth it can compress files heavily without a visible loss of quality.

- It's best to create a new composition by dragging your source video (if you're working with one clip as a bg) over the Create a new Composition icon in the bottom of the Project window. This way After Effects automaticaly find the exact attributes, length and Bit Depth of the video you're using.

- If your computer is too slow, don't forget to change resolution to Half or even Quarter in your Composition window. Or you can preview only a certain region of your composition by hitting a Region of Interest icon right next to the resolution slider in the Composition window and drawing a rectangular shape in your composition. You can even crop the selection by hiting Composition -> Crop Comp to Region of Interest.

- When working with 50% Magnification ratio (you know, just zooming in the composition window with your mouse wheel) it's pointless to set the Resolution higher than to Half. The same way it goes for 25% - set Quarter.

- By holding down spacebar when working in the Composition window, you can bring up the hand tool. It allows you to move with your composition (especially handy when you're working with more than 100% Magnification ratio). It's a great and universal tool you can find in all Adobe applications.

- If you go to Time Control window, unfold the pull-down menu and choose Shift+RAM preview options, you can choose to skip 1-4 frames (when you skip 1, you render every second frame, when you skip 4, you render every fifth frame). If you don't really need to see the video play real time, this method greatly improves RAM rendering times and is very useful for slower computers.

- You can quickly set the work area to the length of a layer by selecting the layer and hiting Alt+Ctrl+B.


- Martin

Wednesday 18 March 2009

Sliding Particles

This is a particle composition I'm creating for a certain shot. If I find some time, I can write a short tutorial...Even though it's not really a hard thing to create, beginners often wonder how to make such animations.


- Martin

Tuesday 17 March 2009

Adobe After Effects Tips #1

User Interface

I'm sure that 90% of After Effects compositors have read this book - Adobe After Effects Studio Techniques. It's great, it's complex and it explains everything, from the very basics of Making the most of UI to Advanced Compositing and Expressions. I like writing notes when learning and since I keep them in my computer, I'm posting them here. I'm sure you'll find at least one thing you didn't know.

- To make any panel in your worspace float (just like in the old 6.5 version) pres CTRL and drag it from its position (it's good f.ex. for Tracker Controls and Render Queue).

- The Lock icon on the top of the active Tab (f.ex. Effect Control) prevents this Tab from closing when you select another layer.

- The ` key (backslash, bellow Esc) brings the selected window into a fullscreen. For normal size hit it again.

- Ctrl + ` = opens all the pull-down panel menus of the layer.

- Ctrl + [ = puts the selected layer down in the timeline, Ctrl + ] puts it up.

- To reset absolutely ALL PREFERENCES (including your Workspaces) hold down CTRL + SHIFT + ALT at startup.

- If you're working with a lot of files, solids and comps in your Project menu, some of them are missing and you can't find those (or you just want to spare some time), hit the binoculars icon in the bottom left corner of the Project window and check the Find Missing Footage.

- If you need to make some changes in a file you're using in your project - say a Photoshop composition - just highlight this file in your Project window, hit CTRL + E. The file opens in the program it was created (in our case Adobe Photoshop), you make the changes, save the file and After Effects will automaticly register the change.

- Ideal way to export your whole project with all the files included is to use File -> Collect Files option. This way you can store everything you need for working with the project in one folder. You just choose if you want to store everything, or only the things used in compositions, only the things used for final render etc. Very handy for transporting projects to different computers.

- If you want to quickly remove all the files you don't use in your compositions, just highlight this comp in your Project window and then hit File -> Reduce Project.

- If you hit File -> Consolidate All Footage, you delete the files that are uploaded multiple times in the Project window, leaving just one.

- If you hit File -> Remove Unused Footage, you remove from the Project Window anything that is not used in any composition.

- You're working on some important project, you've done a great job so far, but you want to make some changes that may end up ruining everything. In this case you may use the File -> Increment and Save option. This way you save your project and every time you hit Increment and save again, you create another copy of the saved project with a sequence number added.

- Enable Auto-save option in Edit -> Preferences -> Auto-save. The default numbers are ok.

This was the first part of what I plan to be a series of useful tips extracted from this great book by Mark Christiansen.

- Martin

Sunday 15 March 2009

Bruce in Action

Based on another great tutorial by Andrew Kramer (visit Videocopilot.net) I tried to create a 3D scene from a still photo. I just typed "action star" in google and guess who popped up? Well, it's not really a guess since you can see him right bellow this text. But I love Bruce, so the choice was quite obvious.

Original image:


Final Render:


I just recently discovered the power of a stamp tool in Photoshop allowing you to clone certain parts of a still image. This way I could cut Bruce out of the image and extend the wall behind him.

- Martin

Saturday 14 March 2009

DVD menu

I didn't really have time for After Effects lately, but I did at least this video for our filmschool projects DVD menu.


- Martin

Wednesday 11 March 2009

Something Exciting This Way Comes

I'm slowly beginning to realize how many wonderful things I can create with combination of 3DS Max models and After Effects postproduction. My notebook is probably going to explode, because I'm forcing it to use every possible MB of memory and graphics at its disposal, but the outcome is definitely worth it.


- Martin

Tuesday 10 March 2009

Switching to 3rd Dimension

Yesterday I started working with 3DS Max. Now, that's not really true, because I've already worked in it several years ago, but it doesn't really count since I haven't created anything at that time. But now it's different - and at this point I simply must mention a tremendous amount of work that people at 3D Buzz put into their video tutorials. They are free, fun, simple and awesome.

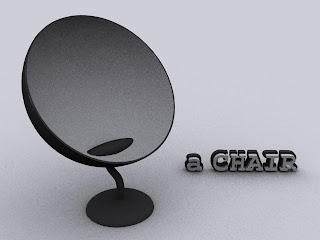
Thanks to their help, I was able to learn the Max fundamentals in just two days (in fact, during one night) and today I created my very first model. A chair. (I better write it down, in case you didn't know what you're looking at :-))


I know, I know, it's nothing fancy, really. But I'm just so overwhelmed by the infinite options that Max gives me that I simply can't force myself not to write this post.

I have no idea how could I do the animation and even 3D compositing in After Effects. 2D compositing - After Effects only. But when you want to play in 3D, go for Max.

- Martin

Monday 9 March 2009

A true Showreel

Thanks to the kind advice from people on TheForce.net forums I realized that the video shown in the last post isn't really a showreel. It's a fancy VFX test, but not a showreel. Because showreel - hence the expression SHOWreel - trully SHOWS things...and the effects displayed in the small windows of my video weren't really that visible to be...you know, recognizable.
Therefore, me - not only beeing an exceptional camera man (as you already know from this post ;-)), but also a very nice and humble guy knowing when to accept his own fault - I have made a new video. Not that fancy and flashy, but this time a real SHOWreel. Enjoy it. And visit TheForce.net forums - a lot of talented people there.


- Martin

Saturday 7 March 2009

Visual Magic

I'm applying for a job in a certain postproduction company and for that purpose I've created this VFX showreel*. Hope you like.


Visual Magic from CamperCz on Vimeo.

* See the "A true Showreel" post.

- Martin

Thursday 5 March 2009

Part of the Space Project

I started a project in After Effects and I couldn't finish it. Sad, really. It was meant to be the best video I've ever done in AAE, unfortunately my laptop is just waay too slow to generate all the effects. And I'm not talking just about rendering time - I had to wait a few seconds for every frame to generate, even in quarter resolution. Working and experimenting was therefore almost impossible and I simply couldn't achieve the quality I wanted.

So I had to cancel it...for now. But I've decided to post at least the beginning.


- Martin

Wednesday 4 March 2009

Sunday 1 March 2009

Unidentified Flying...Smoke?

A very strange thing happened today. I went outside to shoot some shots for my After Effects training and suddenly, when walking along a very inconspicuous bush, two very conspicuous smoky projectiles flew out of it and started to make their way towards the skies. Fortunately, me - beeing an exceptional cameraman - I was able to start my Sony DSR-PD170 and record them right before they disappeared in a flash of light.
Since then I have a strange feeling. As if someone or something was watching me...


Fortunately, I'm just pulling your leg. I don't have Sony DSR-PD170. And there are no UFOs. Just After Effects.

After Effects...closest thing to magic you can get. (...wow, I have to create some fancy swooshing video with this slogan).

- Martin